Getting Down with ...

by ...

Lesson n:

The elements styled by the basic selectors from lesson 3 can be identified independently of their position within the element tree. The elements styled by what we will call the advanced selectors, by contrast, can only be identified by their specific relationships to other elements in the element tree.

Decendant Selectors

Decendant selectors are written as a sequence of space separated elements along the path from the root (html) to the styled element. It is not necessary or usual to list all elements in the path. Matching happens whenever each element specified occurs in the correct order within the path.

ol a {
    font-size: x-large;
}

The style above makes hyperlink (a) elements that are decendents of ordered lists (<ol></ol>) have an extra large font size.

li li li {
    list-style-type: lower-roman;
}

This style sets doubly nested list elements to lower-roman style.

Child Selectors

Child selectors are written as parent-child combination of elements seperated by a > symbol.

section > h2 {
    color: #F70;
}

This style makes h2 elements that are children of section elements orange.

They can be chained together to select very specific sections of the element tree.

section > p  > sup {
    color: #F00;
}

This style makes sup elements that are children of p elements that are children of section elements red.

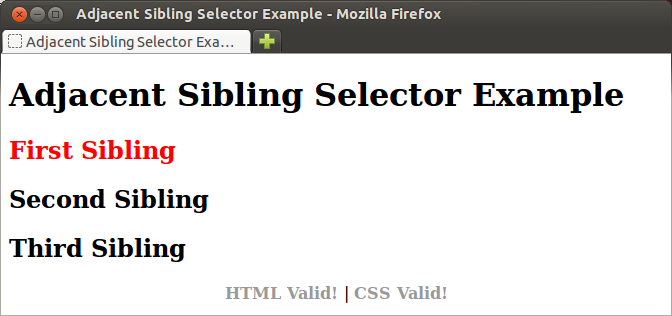
Adjacent Sibling Selectors

Adjacent sibling selector selects an element that immediately follows another element (its adjacent sibling). The two elements are separated by a + symbol when writing the style.

The easiest way to demonstrate how sibling selectors work is to show you an example. Download this file to your computer. Open the file with a text editor, and notice that the body contains one top level heading (h1) followed by three second level headings (h2).

Add the following style to this document:

h1 + h2 {
    color: red;
}

And the document will look like this:

h1 + h2 style

Change the style to:

h2 + h2 {
    color: red;
}

And the document changes to this:

h2 + h2 style

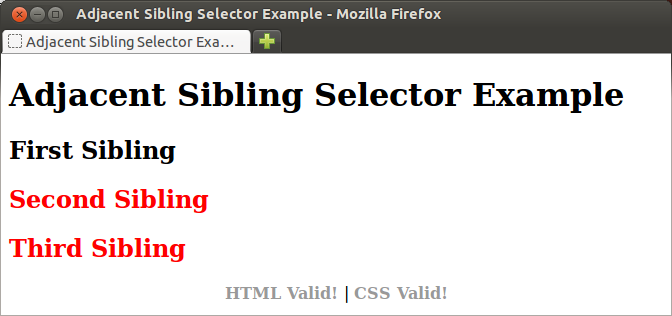
Study this example until you understand why it works the way that it does.

Pseudo-classes and Pseudo-elements

Pseudo-classes

Pseudo-classes behave like classes in html, but instead of being written explicitly using element attributes, they select elements implicitly by their relationship to other elements.

We have already seen the pseudo-classes for the hyperlink element in lesson 3. CSS 1 provides an additional pseudo-class that is very useful, the :first-child pseudo-class. The following style:

p:first-child {
    color: red;
}

will color the text in a paragraph that is the first child of its parent element red. You will explore how this works in more depth in the exercises.

CSS 3 introduces several new pseudo-classes, including:

Psuedo-class Example(s) or Description
:last-child li:last-child
:nth-child( { number expression | odd | even ) tr:nth-child(2n+1) or tr:nth-child(even)
:nth-last-child( { number expression | odd | even ) Works like :nth-child, only it counts from last child instead of first.
:nth-of-type( { number expression | odd | even ) p:nth-of-type(3n-1) or section > img:nth-of-type(odd)
:nth-last-of-type( { number expression | odd | even ) Works like :nth-of-type, only it counts from last child instead of first.

Pseudo-elements

Pseudo-elements are used to style elements which don't actually exist in the HTML markup.

Pseudo-element Example / Description
::first-letter p::first-letter   Styles the first character of text within the element.
::first-line p::first-line   Styles the first line of formatted text within the element.
::before p::before   Specificies content to be inserted immediately before the selected element.
::after p::after   Specificies content to be inserted immediately after the selected element.

Exercises:

  1. Here is a version of the learning_html.html document made as the extra credit exercise in lesson 4 of Getting Down with HTML that has all the in-line style sheets removed (You didn't know back when you made it that you were using in-line style sheets). Make the following changes to this document to style it:
    • As usual, add a style element in the document head.
    • Add a div element around the entire outline (the outer most <ol></ol> tags) with a class attribute set to outline (class="outline").
    • Add the following decendant selector to your style sheet:
      div.outline li {
          list-style-type: upper-roman;
      }
      
      Reload your page and notice what happened. All of the list items items are now upper case Roman. Why? Think about how this works and watch how it changes after the next step.
    • Now add this decendant selector to your style sheet:
      div.outline li li {
          list-style-type: upper-alpha;
      }
      
      Again, reload your page and notice what happened. Take a few minutes to convince yourself you understand why the top level list items are still upper case Roman, but all other levels are now upper case Alpha.
    • Finally add this decendant selector to your style sheet:
      div.outline li li li {
          list-style-type: lower-roman;
      }
      
      Reload your page again. It should now be clear to you how these decendant selectors work. Note that list item decendant selectors would work the same way without the div element enclosing them, but that may cause your style to effect other lists in your site that you didn't want to effect. By having these styles start with div.outline, only those lists you are explicitly intending to be outlines will be effected.
    • Use what you learned in previous lessons to make your document look nicer. Set margins, padding, and a border on the div.outline element, for example, and center the top level heading and footer. Change the color, size, and text-decoration of the hyperlink elements inside footer.
    When you finish, your document might look something like this.
  2. Open the webskills.html you created in the Lesson 4 Exercises. If you were not able to complete those exercises, you can use this one. Again make the following changes to this document to style it, reloading the document after each change to see how it effects the document:
    • Style the body, hyperlinks, and the top level heading inside the header element:
      body {
          margin: 50px;
          background-color: #E6E6FA;
      }
      header h1 {
          text-align: center;
          color: #8B008B;
      }
      a, a:visited {
          text-decoration: none;
      }
      
    • Now style the navigation element inside the header:
      nav {
          display: table;
          margin-left: auto;
          margin-right: auto;
          margin-top: 50px;
          margin-bottom: 40px;
      }
      nav a, nav a:visited {
          padding: 10px;
          border: 1px dotted #777;
          color: #4B0082;
          background-color: #FFF;
          font-weight: bold;
      }
      
    • Change the background color and put a curved border on the section elements to set them off and style the h1 and h2 elements inside them:
      section {
          background-color: #F6F6FA;
          margin-top: 30px;
          padding-left: 30px;
          border: 1px solid #444;
          border-radius: 25px;
      }
      section h2 {
          margin-left: -15px;
          font-size: 2.2em;
          color: #6A5ACD;
      }
      section h3 {
          color: #540093;
      }
      
    • Finally, create CSS buttons for the validation links in the footer:
      footer {
          text-align: center;
          margin-top: 40px;
          font-size: .9em;
      }
      footer a {
          border: 1px solid #777;
          padding-top: 2px;
          padding-bottom: 2px;
          padding-right: 2px;
          margin-right: 10px;
          background-color: #FFF;
      }
      a > strong {
          background-color: #9932CC;
          color: #FFF;
          padding: 2px;
          padding-left: 4px;
          margin-right: 2px;
      }
      
    When you finish, your document should look something like this.