The basic selectors all select elements based on their element type, element attributes, or a combination of both without reference to other elements.
Element selectors apply to a particular element type, like h1,
p, b, or li.
h1 {
    text-align: center;
}
p {
    text-align: justify;
}
b {
    color: #F00;
}
The style sheet above centers all top level headings, justifies paragraphs, and makes bold text red.
When you want more specific control over which elements in your document
receive a style, you can use class selectors. Class selectors require
a class="[class_name]" attribute (review
lesson 1 from
Getting Down with HTML if you don't know what an
attribute is) inside the element to which they will apply:
<p class="standout">
Lorem ipsum dolor sit amet, consectetur adipisicing elit, sed do eiusmod tempor
incididunt ut labore et dolore magna aliqua. Ut enim ad minim veniam, quis
nostrud exercitation ullamco laboris nisi ut aliquip ex ea commodo consequat.
Duis aute irure dolor in reprehenderit in voluptate velit esse cillum dolore eu
fugiat nulla pariatur. Excepteur sint occaecat cupidatat non proident, sunt in
culpa qui officia deserunt mollit anim id est laborum.
</p>
You then create a style selector with a dot (.) followed by the
class name to apply the style to elements with that class.
.standout {
    padding: 20px;
    margin: 20px;
    border: 1px dotted #777;
    font-style: italic;
    color: #191970;
}
Putting these together you can create this
Lorem ipsum dolor sit amet, consectetur adipisicing elit, sed do eiusmod tempor incididunt ut labore et dolore magna aliqua. Ut enim ad minim veniam, quis nostrud exercitation ullamco laboris nisi ut aliquip ex ea commodo consequat. Duis aute irure dolor in reprehenderit in voluptate velit esse cillum dolore eu fugiat nulla pariatur. Excepteur sint occaecat cupidatat non proident, sunt in culpa qui officia deserunt mollit anim id est laborum.
Applying this same class style to an h1 element gives this
In this example a single .standout class selector is used to style
all elements with the class attribute set to
"standout".
Class and element selector can be combined. The p.standout
selector only selects <p></p> elements with class
attribute standout. Likewise, h1.standout will only
apply to standout top level headings, so
h1.standout {
    text-align: center;
}
will center your standout h1s.
ID selectors use the id="[id_name]" attribute in the styled
element together with a #[id_name] selector in the style sheet.
As you will learn in lesson 8, if both a class style
and an id style are applied to the same element, the id style wins.
This id selector
#first {
    color: #070;
}
Would make a paragraph starting with the tag <p id="first">
have dark green color text.
Group selectors use a comma seperated list (or group) of other selector types to apply a style to the whole group of elements.
This group selector
h1, h2, h3, footer {
    text-align: center;
}
Would center the first three heading elements and the footer element.
Hyperlink elements have special pseudo-classes that are used to style
them before they are visited
(clicked), after they are visited, when a
mouse is hovering over them, and while they are being clicked. The following
example shows how these are used.
a:link {
    color: #080;
}
a:visited {
    color: #880;
    text-decoration: none;
}
a:hover {
    color: #0F0;
}
a:active {
    font-size: xx-large;
}
This page shows the hyperlink
psuedo-classes at work. Hover your mouse over a link and watch it change color.
Click on it (and don't let go) and watch the font-size change to
xx-large.
block.html page you made in
lesson 3 of
Getting Down with HTML. If you don't have your own,
you can use
this one.
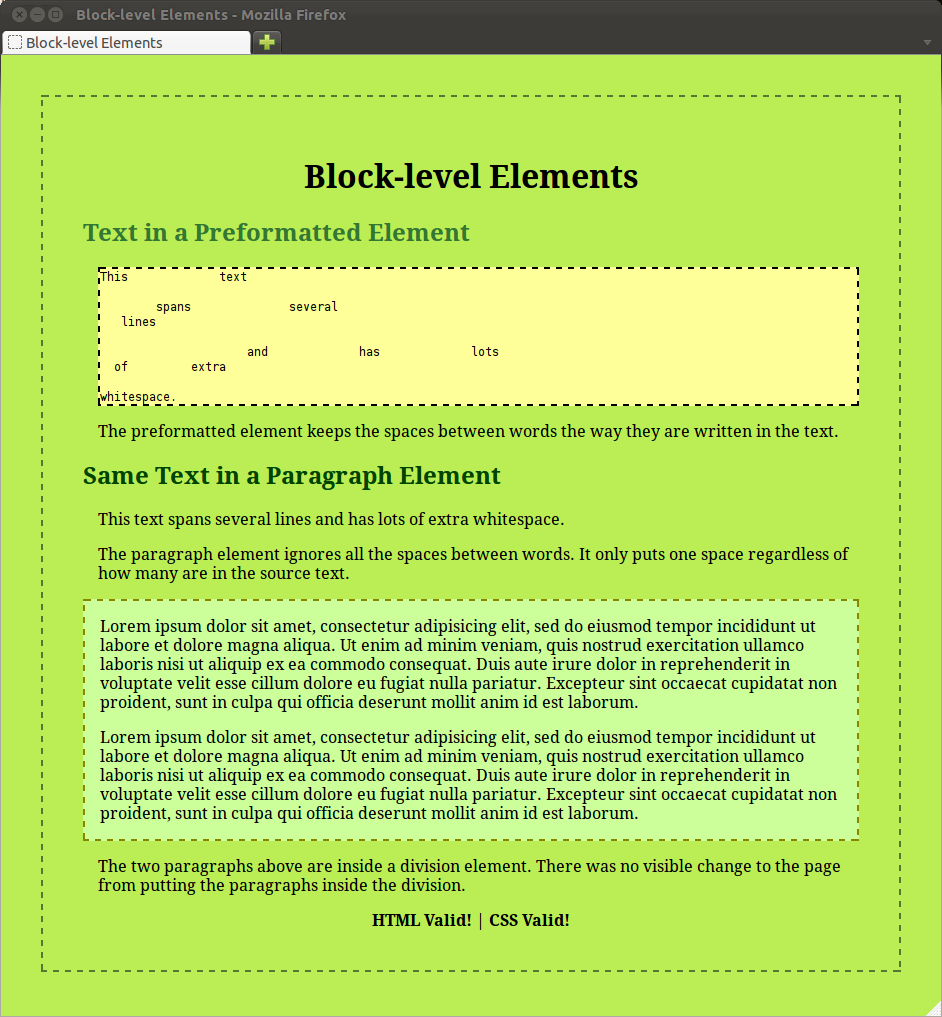
Using this file, make the following changes to the document:
<style></style> element to
document head and the footer element with both
HTML 5 and CSS 3 validation links at the end of the body.
body {
    margin: 40px;
    padding: 40px;
    background-color: #BE5;
    border: 2px dashed #573;
}
h1, footer {
    text-align: center;
}
p, pre {
    margin-left: 15px;
}
.first {
    background-color: #FF9;
    border: 2px dotted #000;
}
.second {
    background-color: #CF9;
    border: 2px dotted #880;
}
#first {
    color: #373;
}
#second {
     color: #040;
}
Then add a class="first" attribute to the pre
element and a class="second" attribute to the
div element. Add id="first" to the first
h2 element and id="second" to the second
h2 element.
a:link, a:visited {
    font-weight: bold;
    color: #000;
    text-decoration: none;
}
a:hover, a:active {
    color: #FF0;
}
a:active {
    font-size: xx-large;
}
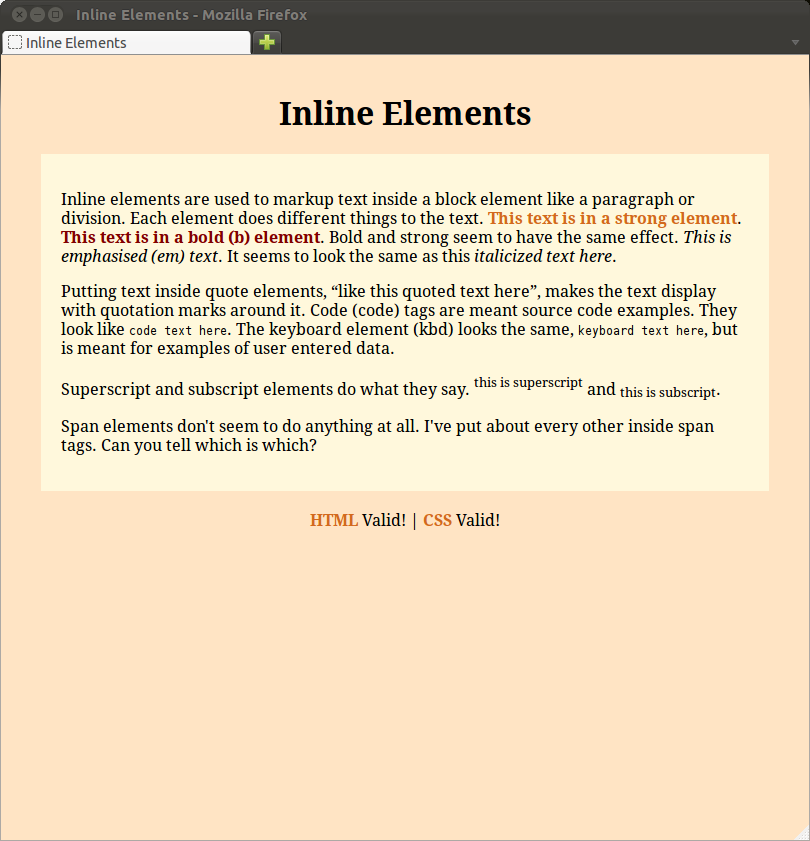
inline.html page you made in
lesson 3 of
Getting Down with HTML. You can use
this if
you don't have your own. As in the previous exercise, add the
footer and style elements. Add this line to the
style element:
@import url(inline.css);Create a new file named
inline.css in the same directory as
your inline.html. Now make the following changes to
inline.css, reloading inline.html in your browser
after each change to see the effects on the document:
body {
    background-color: #FFE4C4;
    margin: 40px;
}
section element to inline.html with the
open section tag (<section>) immediately before the
first paragraph (after the h1 element) and the close section
tag (</section>) immediately after the last paragraph
element before the footer element. Then add the following
style to inline.css:
section {
    background-color: #FFF8DC;
    padding: 20px;
}
h1, footer {
    text-align: center;
}
footer {
    margin-top: 20px;
}
a:link, a:visited {
    color: #000;
    text-decoration: none;
}
b {
    color: #800000;
}
strong {
    color: #D2691E;
}
So while the default appearance of b and strong
elements is the same, using CSS you can style them differently.
inline.html that
haven't been styled. Apply what you have learned so far to style
the em, i, code, kbd,
sup, and sub elements. Make quotes stand out by
adding a distinctive style to the q element.
span
element in the last paragraph of inline.html a different
color.