Map Arlington 3: Setting Up TileStache and Mapnik with Docker
The Problem
The solution stack for this project will require three main components, diagrammed here:
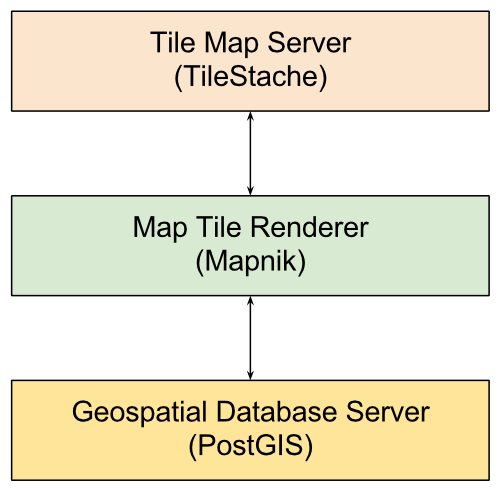
In Map Arlington 1: Extracting OSM Data for a Localized Map Server I described how to setup the first layer of this stack, the PostGIS database. In this part I’ll describe the other two layers, TileStache and Mapnik.
TileStache and Mapnik in Docker
TileStache is a map server written in Python. Mapnik is a toolkit for rendering map tiles. Since configuration of these tools can be tricky I am going to run them from a Docker image created by Matthew Gallagher. I was completely new to Docker when I began this project, but I think I’m already hooked on it. Docker allows for the automation of software applications inside containers that provide and isolated environment for the application.
Installing Docker on Ubuntu 14.04
Here is what I did to get Docker on my system:
$ sudo apt-key adv --keyserver hkp://p80.pool.sks-keyservers.net:80 --recv-keys 58118E89F3A912897C070ADBF76221572C52609D
$ sudo vi /etc/apt/sources.list.d/docker.list
I added the following contents to this file:
# Ubuntu Trusty 14.04 (LTS)
deb https://apt.dockerproject.org/repo ubuntu-trusty main
and then ran:
$ sudo aptitude update
$ sudo aptitude install docker-engine
$ sudo docker run hello-world
to which Docker responded:
Hello from Docker.
This message shows that your installation appears to be working correctly.

To generate this message, Docker took the following steps:
 1. The Docker client contacted the Docker daemon.
 2. The Docker daemon pulled the "hello-world" image from the Docker Hub.
 3. The Docker daemon created a new container from that image which runs the
    executable that produces the output you are currently reading.
 4. The Docker daemon streamed that output to the Docker client, which sent
    it to your terminal.

To try something more ambitious, you can run an Ubuntu container with:
 $ docker run -it ubuntu bash

Share images, automate workflows, and more with a free Docker Hub account:
 https://hub.docker.com

For more examples and ideas, visit:
 https://docs.docker.com/userguide/
Since I want to be able to run Docker as my regular user instead of as root, I created a Docker group and added myself to it:
$ sudo usermod -aG docker [username]
Then I logged out and back in again and ran the docker run hello-world
command as my regular user to confirm that it worked.
Installing Matt’s TileStache Docker Image
With Docker installed and me added to the docker group, it was time to
install Matt’s TileStach Docker image:
$ mkdir .local/docker
$ mkdir .local/docker/tilestache_server
$ cd .local/docker/tilestache_server
Inside this directory I created three files, Dockerfile with contents:
FROM mattva01/tilestache
tilestache.cfg with contents:
{
    "cache": {
        "name": "Test",
        "path": "/tmp/stache",
        "umask": "0000"
    },
    "layers": {
        "ex": {
            "provider": {
                "name": "mapnik",
                "mapfile": "style.xml"
            },
            "projection": "spherical mercator",
            "preview": {
                "lat": 38.88,
                "lon": -77.07,
                "zoom": 12,
                "ext": "png"
            }
        }
    }
}
and style.xml with (note: be sure to substitute all values in square
brackets [] with your own real values):
<Map background-color="white" srs="+proj=merc +a=6378137 +b=6378137 +lat_ts=0.0 +lon_0=0.0 +x_0=0.0 +y_0=0 +k=1.0 +units=m +no_defs">
    <Style name="admin">
        <Rule>
            <PolygonSymbolizer fill="#f2eff9" />
            <LineSymbolizer stroke="rgb(50%,50%,50%)" stroke-width="0.1" />
        </Rule>
    </Style>
    <Style name="roads">
        <Rule>
            <LineSymbolizer stroke="red" stroke-width="1.5" />
        </Rule>
    </Style>
    <Datasource name="db">
        <Parameter name="type">postgis</Parameter>
        <Parameter name="host">[http://host.url.com]</Parameter>
        <Parameter name="port">5432</Parameter>
        <Parameter name="dbname">[database_name]</Parameter>
        <Parameter name="user">[username]</Parameter>
        <Parameter name="password">[password]</Parameter>
    </Datasource>
    <Layer name="world" srs="+proj=merc +a=6378137 +b=6378137 +lat_ts=0.0 +lon_0=0.0 +x_0=0.0 +y_0=0 +k=1.0 +units=m +no_defs">
        <StyleName>admin</StyleName>
        <Datasource base="db">
            <Parameter name="table">osm_new_admin</Parameter>
        </Datasource>
    </Layer>
    <Layer name="admin" srs="+proj=merc +a=6378137 +b=6378137 +lat_ts=0.0 +lon_0=0.0 +x_0=0.0 +y_0=0 +k=1.0 +units=m +no_defs">
        <StyleName>roads</StyleName>
        <Datasource base="db">
            <Parameter name="table">osm_new_mainroads</Parameter>
        </Datasource>
    </Layer>
</Map>
With these three files in place, I ran:
$ docker build -t jelkner/mytilestache .
When this finished, I ran typed docker images and hit the <TAB> key
twice, and saw:
jelkner/mytilestache mattva01/tilestache
To start the server, I ran:
$ docker run --rm -it -p 8080:8080 jelkner/mytilestache
and docker responed with:
[2015-11-22 01:52:40 +0000] [5] [INFO] Starting gunicorn 19.3.0
[2015-11-22 01:52:40 +0000] [5] [INFO] Listening at: http://0.0.0.0:8080 (5)
[2015-11-22 01:52:40 +0000] [5] [INFO] Using worker: sync
[2015-11-22 01:52:40 +0000] [10] [INFO] Booting worker with pid: 10
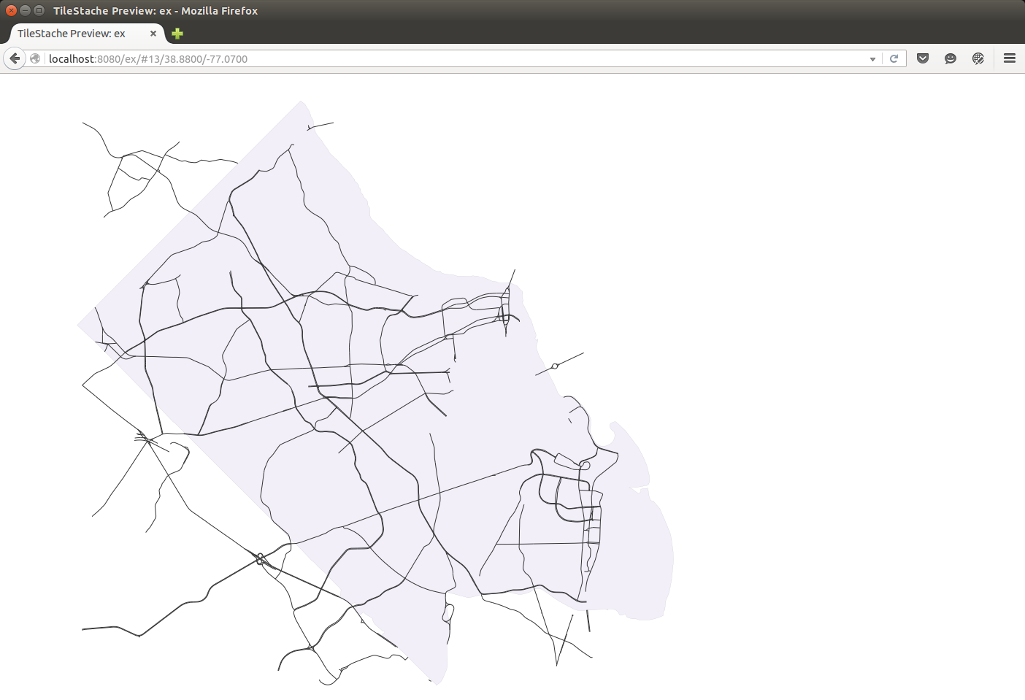
I then pointed my browser at localhost:8080 and was greated with
TileStache bellows hello. Adding \ex\ to the end of the URL, and I
could see the map:

My next task is to learn how to modify the style.xml file control the map.
I made a two simple changes to get the processes started:
I changed the “zoom” value from
12to13intilestache.cfg.I changed:
<Style name="roads">
    <Rule>
        <LineSymbolizer stroke="red" stroke-width="1.5" />
    </Rule>
</Style>
to:
<Style name="roads">
    <Rule>
        <LineSymbolizer stroke="#333333" stroke-width="1.0" />
    </Rule>
</Style>
Then I ran the following commands, which I will have to do after each change in order to apply it and see the results:
$ docker build -t jelkner/mytilestache .
$ docker run --rm -it -p 8080:8080 jelkner/mytilestache
after which the map looked like this: