
The Robots are Coming!
Introduction
When you’ve finished working through this sheet, you’ll have written a program that plays a surprisingly addictive game: a version of the classic console based game, robots, in which you’re surrounded by robots who are trying to catch you, and you have to outwit them by fooling them into crashing into one another.
This is quite a difficult sheet, especially since we are not going to give you quite as much help as you’ve had in previous sheets. You’re supposed to be learning to do things on your own, after all! However, this sheet does introduce a lot of things you haven’t seen before, so you should feel free to ask your teacher for help at any time.
What you need to know
The game
We’d better begin by explaining exactly how the game works.
You’re being chased by robots. They are armed, and if a robot manages to catch you, you’re dead. You have no weapons. Fortunately, the robots are rather stupid. They always move towards you, even if there’s something in the way. If two robots collide then they both die, leaving a pile of junk. And if a robot collides with a pile of junk, it dies. So, what you’re trying to do is to position yourself so that when the robots try to chase you they run into each other!
It turns out that that’s a little too hard; it’s too easy to get into a position where all you can do is wait for the robots to catch you. So you’ll give the player the ability to teleport to a random place on the screen.
It’s simplest to make everything happen on a grid of squares. So the player can move in any of the 8 compass directions, and at each turn a robot will move one square in one of those 8 directions; for instance, if the robot is north and east of the player then it will move one square south and one square west.
Planning it out
Let’s begin by thinking about what needs to happen when you play the game.
Position the player and the robots on the screen.
Repeatedly
move all the robots closer to the player
check for collisions between robots, or between robots and piles of junk
check whether the player has lost — if so, the game is over
check whether all the robots are dead — if so, restart the game at a higher level — with more robots!
allow the player to move or teleport
There’s a lot of stuff here. Let’s start, as usual, by writing some easy bits.
Moving the player around
All the action takes place on a grid. Your graphics window is 640 pixels by 480; let’s make the grid 64 by 48 squares, each 10 pixels on a side. That’s a pretty good size.
You need to represent the player by something you can draw using the graphics facilities described in Sheet G (Gasp). We suggest that a filled-in circle will do as well as anything else.
So, let’s write a simple program that lets you move the player around the screen. This involves a bunch of stuff that’s new, so we’ll lead you through it carefully.
An outline of the program
To make this program easier to follow — remember that it will be getting
bigger and bigger as you add bits to it, until it’s a program to play the
complete game of Robots — you’ll divide it up using functions. (See Sheet 3 ( Pretty Pictures), and Sheet F
(Functions).) So, begin by typing in the following program in a file named
robots.py:
from gasp import *          # So that you can draw things

begin_graphics()            # Create a graphics window
finished = False

place_player()

while not finished:
    move_player()

end_graphics()              # Finished!
If you try to run this program now, Python will complain that place_player
and move_player are not defined. Let’s make stub versions of these
functions so that we can get the program to run without complaint:
def place_player():
    print("Here I am!")

def move_player():
    print("I'm moving...")
    update_when('key_pressed')
The command update_when('key_pressed') makes the program to wait for the
user to press a key before doing anything else.
- Challenge 1
Add these temporary function definitions and run your program to confirm that the errors are gone. You will need to remember to place the function definitions before the function calls.
As the program develops, we’ll add bits to the program skeleton we’ve just
created — for instance, there’ll be a place_robots() function added quite
soon. For the moment, your task is to define those functions so that the
player can move around the screen.
Where to start?
Let’s look at place_player(), which decides where on the screen the player
should begin. This at least is easy.
Let’s have two variables inside this function called player_x and
player_y, saying where the player is. You could either make them contain
the player’s coordinates in pixels, or the coordinates in grid squares (which
will be 10 times smaller, because we’re going to make each grid square 10
pixels on a side).
Either is perfectly workable. We prefer the latter. You should probably go along with our preference, because for the rest of this worksheet we’re going to assume that’s what you have done!
We better explain this business about grid coordinates a bit more
carefully. The graphics window is made up of 640 x 480 pixels. We’re
chopping them up into 64 x 48 squares.

So, the bottom-left pixel of square (17, 23) is pixel (170, 230) and its top-right pixel is pixel (179, 239).
Back to place_player(). It needs to set the variables player_x and
player_y randomly. player_x can have any value from 0 to 63;
player_y can have any value from 0 to 47. If you can’t remember how
to do that, look back at Sheet 2 (Turning the
Tables) where randint() was introduced. Multiplying these values by 10, we
will get the pixel coordinates of the bottom-left corner of a grid square.
Also, since the circle coordinates are for the center of the circle, we need
to move our circle with a 5 pixel radius by 5 pixels up and to the right so
that it is centered in the grid square.
We can then put the player on the screen by saying something like
Circle((10 * player_x + 5, 10 * player_y + 5), 5, filled=True)
(note: if you’re confused by the filled=True bit, you might like to take
a look at Sheet F (Functions)), which describes
keyword arguments.)
- Challenge 2
Change
place_playerso that it creates a random circle on the screen.
Moving the player
Now, you need to move that circle around in response to what the player does at the keyboard. This involves two new ideas – moving graphics, and keyboard handling. Let’s deal with the first one first.
In the Python Shell window, type the following:
>>> from gasp import *
>>> begin_graphics()
>>> c = Circle((320, 200), 5)
The last line still draws the circle, but it does something else too: it returns a value, and that value can be used later to move the circle around (or remove it from the window completely).
So, try doing this:
>>> move_to(c, (300, 220))
The circle should move when you do that.
- Challenge 3
Write a small program that creates a ball (
Circle) and has a loop that makes the ball move smoothly from the lower left corner of the screen (0, 0) to the upper right corner (640, 480). A few hints may be helpful:If the circle has a radius of 5, then you should start it at (5, 5) instead of (0, 0) so that it looks like it is in the corner of the screen instead of off the edge.
640 to 480 is a ration of 4 to 3. If you change the circle’s x value by 4 and it’s y value by 3 each time you go through the loop it will travel where you want it to go.
Use a
whileloop and check that the x value (call itball_x) is less than 635. Then just incrementball_xandball_yeach time through the loop.After each
move_tocommand, use GASP’s built-insleepcommand to make the program pause a bit before moving to the next location. If you don’t do this, the graphics window will flash before your eyes and you won’t see much of anything at all. You don’t need to sleep long.sleep(0.02), which pauses for 2 hundredths of a second, seems to work well.
One other thing:
>>> remove_from_screen(c)
You can probably guess what that does, but you should try it anyway.
Keys
That’s all very well, but of course no one will play this game if they don’t get to choose where the player moves! The easiest way to do this is to let the player use the keyboard. You’ll allow movement in 8 different directions…
… and of course you should allow the player to stay still. So you’ll need a
3 x 3 grid of keys. Your keyboard almost certainly has a numeric keypad
on the right: the numbers 1-9 will do fine. So, for instance, pressing 7
should make the player move upwards and to the left.
Therefore, what you have to do inside move_player() is to test which of
those keys — if any — is pressed.
The function update_when('key_pressed') returns a string with the key that
was pressed. Keys are represented by the characters they produce. Letter keys
are represented by lowercase letters.
- Challenge 4
Run the following program, go over to the Graphics Window and press some keys. When you’re done, press the
qkey.from gasp import * begin_graphics() key_text = Text("a", (320, 240), size=48) while True: key = update_when('key_pressed') remove_from_screen(key_text) key_text = Text(key, (320, 240), size=48) if key == 'q': # See Sheet C if you don't understand this break # See Sheet L if you aren't sure what this means end_graphics()
Which command is printing text onto the graphics window? Try using this command to display longer strings of text.
So, now you know how to tell what keys are pressed, and you know how to move an object around. It’s time to put the two together…
Change place_player so that it puts the value returned from Circle() in
a variable (call it player_shape); and …write a move_player()
function that uses keys_pressed() to see what keys are pressed, and moves
the player if any of the keys 1 – 9 are pressed. Moving the player requires:
Updating
player_xandplayer_yCalling
move_toto move the player on the screen
Eeek! we bet you find it doesn’t work. Specifically, the move_player()
function will say it’s never heard of the variables you set in
place_player(). What’s going on?
If you haven’t already read Sheet F (Functions), now might be a good time to glance at it.
The important point is that any variables you set in a function
(e.g., player_x in place_player()) are local to that function: in
other words, they only exist inside the function, and when the function
returns they lose their values.
Usually this is a Good Thing — for reasons discussed briefly in Sheet F (Functions) — but here it’s a nuisance. Fortunately, there’s a cure.
Suppose you have a function definition that looks like this:
def f():
    # blah blah blah
    x = 1
    # blah blah blah
Then x is a local variable here, and calling f won’t make a variable
called x that exists outside f:
>>> f()
>>> print(x)
Blah blah blah ERROR ERROR blah blah
NameError: x
But if you add to the definition of f a line saying global x like this:
def f():
    global x

    x = 1
(just after the def, and indented by the same amount as the rest of the
definition), then the variable x inside f will be global — in
other words, x will mean just the same inside f as it does outside. So
the print(x) that gave an error with the other version of f will now
happily print 1 .
We hope it’s clear that this bit of magic is what you need to fix the problem
with place_player() and move_player(). Add global statements to both
definitions.
At this point, you should have a little program that puts a circle on the screen and lets you move it around using the keyboard. Fair enough, but
there’s not much challenge there, without any robots, and
you might notice that the player can move off the edge of the window!
Let’s deal with the second of those problems first. After the player’s move,
see whether he’s off the edge — either coordinate negative, or x > 63, or
y > 47. If so, repair the offending coordinate in what we hope is the
obvious way. An even better approach is to check whether you are about to go
out of bounds and if you are, don’t do it.
- Challenge 5
After making the variables global, change
place_playerand addmove_playerto yourrobots.pyprogram so that you can move the player around the screen by pressing the number keys.Here are some bits of the
move_playerfunction to help you:def move_player(): global player_x, player_y, player_shape key = update_when('key_pressed') if key == '6' and player_x < 63: player_x += 1 elif key == '3': if player_x < 63: player_x += 1 if player_y > 0: player_y -= 1 # You fill in the rest here... move_to(player_shape, (10 * player_x + 5, 10 * player_y + 5))
We’ve introduced a few things you haven’t seen before in the above challenge:
x += y(and-=,*=,/=) is short forx = x + y.andis used to join to conditions together. Theifstatement will only run if both of the two sides of theandare true. You may wonder why we didn’t use theandwhen bothplayer_xandplayer_ywere changing. Well, since they need to be tested independently of each other, usingandwill not work.
Adding a robot
Eventually, you’ll have the player being pursued by a horde of robots. First, though, a simpler version of the program in which there’s only one robot.
Before the line of your program that says place_player(), add another that
says place_robot(). Write the place_robot() function: it should be very
much like place_player(), except of course that you should (1) use
different names for the variables and (2) draw a different symbol. We suggest a
box, unfilled. You may need to think a bit about exactly where to put the
corners of the box.
Remember to use the global statement as you did in place_player().
- Challenge 6
Add a
place_robotfunction to your program as described above. Add a call to this function and confirm that a robot (Box) appears on the screen when you run the program.
Moving the robot
After the move_player() line, add another that says move_robot(). Now
you need to work out how to move the robot. The robot should move according to
the following rules:
If a robot is to the left of the player, it moves right one square.
If a robot is to the right of the player, it moves left one square.
If a robot is above the player, it moves down one square.
If a robot is below the player, it moves up one square.
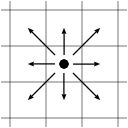
So, if a robot is both left of the player and above the player, it will move down and to the right. This diagram may make it clearer how the robots move.

- Challenge 7
Write the
move_robotfunction. It needs to look at the positions of player and robot, and decide where to put the robot according to the rules above; and then actually put it there.
This function doesn’t need to check whether the robot is trying to walk off the edge of the screen. Can you see why?
Try your program. Even if you haven’t made any mistakes, it still won’t be much fun to play, for the following reason…
One problem
As you move the player around the screen, the robot moves toward him, until it catches him, and then sits on top of him from then on. Once that’s happened, the game obviously ought to be over, but it isn’t. The robot just sits on top of the player and moves wherever he does.
This problem is easy to fix. After the call move_robot(), add another
function call: check_collisions(). Then write a function
check_collisions(), which tests whether the player has been caught by the
robot. That happens if, after the robot’s move, the player and the robot are in
the same place. And that happens if player_x and robot_x are equal,
and player_y and robot_y are equal. You probably need to look at
Sheet C (Conditions and Conditionals) to find out how to
say if this is true and that is true , if you haven’t already done that.
If they are in the same place, the program should print a message saying
something like “You’ve been caught!”, and set that finished variable that
gets tested at the top of the main while loop to something other than
False (True would be an excellent choice).
Then the program will finish when the player gets caught. You can even use the
Text object you saw a bit earlier to display this message in the graphics
window and the sleep function you used in Challenge 3 to get the computer
to do nothing for 3 seconds (with sleep(3)).
- Challenge 8
Add the function
check_collisionsto your program as described above. Be sure to add a call tocheck_collisionsin your program aftermove_robotis called. Havecheck_collisionssetfinishedtoTrue, useTextto display the message, “You’ve been caught!”, andsleepto keep the message visible for 3 seconds before you program ends and the graphics window closes.
Two more problems
Once you’ve fixed that problem and tried your program, you’ll probably notice one or two more.
There’s no escape: the robot will just chase the player to the edge of the screen, and then the player has nothing to do other than die.
Very occasionally, the robot will actually start in the same place as the player, who will then be instantly doomed.
It will be easier to fix the first problem after we have fixed the second one.
The trick is to change place_player so that it never puts the player in the
same place as the robot. How to do that? Just place the player at random; if
he’s in the same place as the robot, try again (still at random) and check
again (and again, and again, if necessary, until the player and robot are in
different places). This is just a while loop again. Because the test in a
while loop always has to go at the start, it will have to look (in outline)
something like this:
choose the player's position at random

while the player and robot haven't collided:
    choose the player's position at random
Notice that you have to choose the player’s position at random twice here. This is a good indication that you should put it in a function – whenever you have something that gets done more than once in your program, you should think about making it into a function.
In fact, choose the player’s position at random is already in a function. The
function is called place_player, and that’s exactly what it does. So we
need a new function to do the more complicated thing above; let’s call it
safely_place_player, and have it use place_player to place the player:
def safely_place_player():
    place_player()

    while collided():
        place_player()
Notice that we are introducing another new function here, collided, whose
job it will be to check whether the player and the robot are in the same place
(you already know how to do that, right?), and to return True or False
depending on the result.
You can use collided here and also in check_collisions. If you don’t
already know about returning a value from a function , have a look at Sheet F (Functions) now. Also, if you still haven’t read
Sheet C (Conditions and Conditionals), now would be a very
good time.
- Challenge 9
Add the function
collided()to your robots program.collidedshould returnTruewhen the player and robot are in the same location andFalsewhen they are not. Change thecheck_collisionsfunction to usecollided.
- Challenge 10
Add the
safely_place_playerfunction to your program as it is written above. Change your program to callsafely_place_playerinstead ofplace_player.
The problem is that you’ve just introduced a bug into your program that may not
get noticed for awhile, and when you see it later, it will be hard to figure
out why it is happening. place_player as we’ve written it is only meant
to be called once. It makes a circle and gives it the name player_shape.
We use this name to move the circle around the graphics window.
If you call place_player again, player_shape will be the name of a new
circle, and the old circle won’t have a name anymore. So it will sit there in
your graphics window and you won’t be able to move it or remove it from the
screen.
The reason that you might not notice this bug for a long while if we didn’t
just tell you about it is that it will be pretty rare at this stage for the
player to be randomly placed on top of the robot, so safely_place_player
will usually call place_player only once, and you won’t notice the bug.
Later, when there are lots of robots and the problem becomes much more likely, you will see these circles on the graphics window and not know where they came from.
The easiest way to fix this problem is:
- Challenge 11
Take the creation of the
player_shapecircle out ofplace_playerand only create it insidesafely_place_playerafter thewhileloop. You will need to add the appropriateglobalstatement to make this work.
Now that you have fixed the second problem, it won’t be hard to fix the first one. You’ll let the player teleport — move instantaneously to a new place on the screen.
You don’t want them ever to land on top of a robot. So, in move_player,
test for the 5 key being pressed; if it’s pressed, move the player to a
random empty space on the screen… which you already know how to do — just
call safely_place_player().
There is a problem with just adding a new elif test to move_player and
letting that call safely_place_player. It is again the kind of bug you may
not notice for awhile (those are the peskiest kind of bugs!).
safely_place_player makes sure not to place the player on top of the
robot, but very occasionally it will place it immediately next to the robot.
It will then be the robot’s turn to move, and… “You’ve been caught!” will
appear on the screen. This is not the kind of safe teleport we had in mind.
A good solution to this problem is to check for the teleport at the beginning
of move_player — immediately after the
key = update_when('key_pressed') command, and then to let the player have a
chance to move again before the robot’s move. You could start by adding
something like this:
if key == '5':
    remove_from_screen(player_shape)
    safely_place_player()
    key = update_when('key_pressed')
This almost does what we want, but there is still a problem. What will happen if you teleport twice in a row?
- Challenge 12
Think of a way to allow repeated teleports (hint: change the
ifstatement to a loop that keeps repeating as long as the5key is pressed). Make the changes to yourmove_playerfunction and test it to confirm that it works.
So far, so good
Let’s take a moment to review what you have so far. The player and one robot are placed on the screen, at random. They both move around, in the correct sort of way. If they collide, the game ends. The player can teleport.
This is pretty good. There are just two more really important things to add.
There ought to be lots of robots, not just one.
The robots will then be able to crash into each other, as well as into the player. When that happens, you need to remove both the robots from the game and replace them with a pile of junk that doesn’t move. You also need to check for robots crashing into junk.
The first of these is a pretty major change. If you haven’t already been saving lots of different versions of your program, now would be a very good time to make a copy of the program as it is now. You’re about to perform major surgery on it, and it would be wise to keep a copy of how it was before you started operating.
A touch of class
Before you do that, though, some minor surgery that will make the major surgery easier. To explain the minor surgery, a major digression will be needed, so here is one.
Try doing this in your Python Shell window.
>>> class Robot:
...     pass
...
>>> fred = Robot()
>>> fred.x = 100
>>> fred.y = 200
>>> print(fred.x, fred.y)
We’re sure you can guess what that last print statement will print.
What you’ve done is to define a class called Robot. Roughly, class
means kind of object . In other words, you’ve told the computer In the future,
I might want to talk about a new kind of thing. Those things are called
Robots. You can do all kinds of clever things with classes, but you won’t
need anything fancy in this sheet; just the very simplest things.
All pass means is we have nothing to say here . It’s sometimes used in
if and while statements; so, for instance, to sit and wait until a key
is pressed in the graphics window you could say
while not keys_pressed():
    pass
which translates as repeatedly, as long as there are no keys pressed,
do nothing . In this class definition, it means There’s nothing else to say
about the Robot class. .
What does the line fred = Robot() mean? Remember we told you about a new
kind of thing called a Robot? Well, we want one of those. Call it
fred. The thing that gets named fred is what’s called an instance
of the Robot class.
Class instances (like fred in the little example above) can have things
called attributes. For instance, fred.x is an attribute of
fred. Attributes are rather like variables; you can do all the same things
with them that you can with variables. But an attribute is really more like an
array element, or — if you’ve read Sheet D
(Dictionaries and Tuples) like a value in a dictionary: it’s part of an
object.
For instance, after the example above, suppose you say
>>> bill = fred
>>> print(bill.x)
(assuming this is a continuation of the previous interpreter session…)
Then the machine will print 100, just as it would have if we’d asked for
fred.x, because fred and bill are just different names for the same
object, whose x attribute is 100.
What on earth does all this have to do with your game? Well, there are three
separate pieces of information associated with the player and with the robot in
the game: two coordinates, player_x and player_y, and one other thing,
player_shape, used for moving the shape on the screen that represents the
player.
Incidentally, the thing called player_shape is actually a class instance,
though its class definition is slightly more complicated than that of Robot
in the example above. You’re about to have, not just one robot, but lots of
them. Your program will be much neater if all the information about each robot
is collected together into a single object.
In fact, this is an important idea to know whenever you’re designing a program:
Whenever you have several different pieces of information that describe a single object, try to avoid using several different variables for them. Put them together in a class instance, or a list, or a tuple, or a dictionary, or something.
- Challenge 13
Improve your program by grouping sets of variables together into class instances:
At the beginning of the program (after
from gasp...), add two class definitions:class Player: pass class Robot: pass
At the beginning of
place_player(after theglobal statement), sayplayer = Player().At the beginning of
place_robot, sayrobot = Robot().Change the
globalstatements so that they only globalise the variablesplayer(instead ofplayer_xetc) orrobot(instead ofrobot_xetc).Change all references to
player_x,player_yandplayer_shapetoplayer.x,player.yandplayer.shape.Do the same for
robot.Test your program to be sure it still works. If it doesn’t, fix any errors until it does.
Lots of robots
Now would be another good time to save a copy of your program!
You’ve already met lists, very briefly, in Sheet 1 (Introducing Python). It would be a good idea, at this point, to have a quick look at Sheet A (Lists); you don’t need to absorb everything on it, but reminding yourself of some things lists can do would be a good move.
What you’ll do is to have, instead of a single variable robot, a list
robots containing all the robots on the screen. Each element of the list
will be an instance of the Robot class.
So, what needs to change?
- Challenge 14
place_robotshould be renamedplace_robotsin both the definition and the call.rename robot to robots in the global statement at the beginning of the function.
Make a new variable named
numbotsin the main body of the program that will determine the number of robots thatplace_robotswill create.place_robotsshould makenumbotsnewRobotinstances and put them together in a list.hint: Use a
forloop like this:for i in range(numbots): # all the stuff you need to do to make a robot here... robots.append(robot)
You will need to create
robotsas an empty list before theforloop.To be able to test this without crashing the program, comment out the calls to each of the functions we have temporarily broken until we can fix each of them in turn. All you want now is a call to
place_robots, so your main program should look something like this:begin_graphics() numbots = 10 finished = False place_robots() #safely_place_player() #while not finished: #move_player() #move_robot() #check_collisions() update_when('key_pressed') end_graphics()
Make all these changes and test your program. You should see a graphics window with 10 robots, which closes as soon as you press any key.
Well, you probably saw 10 robots, but you haven’t checked to see if any of
the robots ended up being randomly placed on top of another one. We already
have a function, collided which checks whether the player and a single
robot are in the same place. That won’t be very useful anymore, since we
will be interested in whether or not the player has hit any robot.
Let’s change collided so that it does this, and at the same time can be
used to see whether a new robot has hit any of those already in the list.
To do this we will make the player (or robot) and the list of robots arguments which we pass into the function (now would be a good time to read over Sheet F (Functions) with special attention to the section on functions with arguments):
def collided(thing1, list_of_things):
    for thing2 in list_of_things:
        if thing1.x == thing2.x and thing1.y == thing2.y:
            return True
    return False
Look at this function carefully until you understand why it works.
collided should return true as soon as it finds something in the list in
the same place as the thing you are checking. If it never finds anything, it
finishes the for loop and hits the return False statement.
Since both robots and the player have x and y attributes, we can use this same function with either one.
- Challenge 15
Change your
collidedfunction to be like the one above. Then use this newcollidedfunction to makesafely_place_playerwork again. You will useplayeras the argument forthing1androbotsas the argument forlist_of_things. Uncommentsafely_place_playerand test that this works.
With a few modifications to place_robots, we can use our new collided
function to keep robots from being placed on top of each other. We will make
use of the built-in len function that tells how many items are in a list:
from random import randint

def place_robots():
    global robots

    robots = []

    while len(robots) < numbots:
        robot = Robot()
        robot.x = randint(0, 63)
        robot.y = randint(0, 47)
        if not collided(robot, robots):
            robot.shape = Box((10*robot.x, 10*robot.y), 10, 10)
            robots.append(robot)
Let’s stop a minute to talk about how this works. Since it is a matter of
chance whether a robot will end up placed on top of another one, we don’t know
in advance how many times that will happen, so we can’t use a for loop.
What we do instead is use a while loop, and keep trying to add new robots
to the list, discarding those that land on top of previous ones, until we have
all the robots in the list that we want (when len(robots) == numbots).
We delay adding a shape attribute to each candidate robot until we know it hasn’t landed on any other robots, so we don’t litter our graphics screen with boxes.
- Challenge 16
Change your
place_robotsfunction to match the one above. Test it to make sure it works. Then uncomment thewhileloop and the call tomove_playerin the main body of the program, and remove the call toupdate_when. Check to see that you can run your program, and that you can move your player (the robots won’t move yet).
Now let’s make the robots move and check for collisions with the player. We leave the details of making this work up to you.
- Challenge 17
Change the name of the function
move_robottomove_robotsin both places where it occurs (the definition and call). Then modify the function so that it loops over all the robots in the list (hint: use aforloop), moving each one in turn. Uncomment the call tomove_robotsin the main body of your program and make sure that it works.
- Challenge 18
Modify
check_collisionsso that it works again. The only thing you will to change is the call tocollided. Uncomment the call tocheck_collisionsin the main body of the program and test it.
Winning the Game
OK, we everything working again that we did before we decided to add lots of robots, but we still don’t have a way to win the game, since our robots are still invincible. We can move around and teleport until they all end up on top of each other, but the darn things won’t die.
To get them to die will be the trickiest part of the program, because it involves checking whether or not each of the robots has collided with any of the others, and then:
If a robot hits a robot, remove one of them and turn the other into a piece of junk.
If a robot hits a piece of junk, remove it.
Before solving these problems, we need to decide how we are going to represent the pieces of junk. Pieces of junk and live robots should differ in two ways:
They should look different, so you can tell them apart.
Robots move and pieces of junk don’t.
Let’s create a new empty list, called junk, where we will place robots that
have died. Whenever we find two robots that have collided, we will change one
of them into a piece of junk and add it to the junk list.
Now let’s figure out how we can handle collisions…
Checking for Robot Collisions
We need to be able to check whether two robots have collided. It turns out that we will want to know more than just “have some robots collided?”; we need to know which robots, so that we can remove one of them and turn the other into junk.
The best thing to do is to have a function that determines, for a particular
robot, whether any robot earlier in the list has collided with it. Then, if
we run through the whole list checking this, we’ll pick up every collision
exactly once. Can you see why? The function will return either False or the
Robot instance that has crashed with the robot we’re asking about. Since
we are sending it one of the robots that crashes, and the other one is
returned, we get both the robots we are looking for:
def robot_crashed(the_bot):
    for a_bot in robots:
        if a_bot == the_bot:    # we have reached our self in the list
            return False
        if a_bot.x == the_bot.x and a_bot.y == the_bot.y:  # a crash
            return a_bot
    return False
By looping through the robot list again, and sending each robot to
robot_crashed in turn, we can identify all robots that have crashed into
another robot. The question is, what do we do with them once we find them?
When a collision happens, we need to remove one of the colliding robots from
circulation completely. If you’ve read Sheet L (Loops),
you’ll know about the del statement, which can remove an item from a list.
You might be tempted to try to use del to remove one of the robots, but
this approach can produce really weird errors, since you would be modifying a
list while you are looping through it.
To understand why this is a problem, a detour is in order…
Why del is dangerous
Deleting things from a list while looping over the list is dangerous. Here are a couple of terrible examples of the sort of thing that can happen:
>>> my_list = [0, 1, 2, 3, 4, 5, 6, 7, 8, 9]
>>> for i in range(0,len(my_list)):
...    if my_list[i] == 3 or my_list[i] == 7:
...        del my_list[i]
...
Traceback (innermost last):
  File "<stdin>", line 2, in <module>
IndexError: list index out of range
>>> my_list
[0, 1, 2, 4, 5, 6, 8, 9]
- Challenge 19
Work out exactly what’s gone wrong here.
OK, let’s try another way.
>>> my_list = [0, 1, 2, 3, 4, 5, 6, 7, 8, 9]
>>> for item in my_list:
...     if item == 3 or item == 7:
...         del my_list[my_list.index(item)]
...
>>> my_list
[0, 1, 2, 4, 5, 6, 8, 9]
Looks like it works. Let’s try another example.
>>> my_list = [0, 1, 2, 3, 4, 5, 6, 7, 8, 9]
>>> for item in my_list:
...     if item == 3 or item == 4:
...         del my_list[my_list.index(item)]
...
>>> my_list
[0, 1, 2, 4, 5, 6, 7, 8, 9]
Uh-oh. 4’s still there.
- Challenge 20
Work out what the trouble is this time.
Once you’ve done that, it might occur to you to try to repair the first example like this:
my_list = [0, 1, 2, 3, 4, 5, 6, 7, 8, 9]
for i in range(0, len(my_list)):
    if my_list[i] == 3 or my_list[i] == 7:
        del my_list[i]
        i = i - 1
Unfortunately, this behaves in exactly the same way as the other version did.
- Challenge 21
Work out why.
If you’ve managed all those, you’ll probably (1) understand lists and loops pretty well, and (2) be very frustrated. There are a couple of tricks that will work. For instance, if you repeat your second attempt, but loop backwards, that will work.
An even simpler way is to build a completely new list to replace the old one; and that’s what we will do here. So…
What we will actually do
Everything we have left to do can be handled by the check_collisions
function, so let’s get to work on that. To begin with, it should look
something like this:
def check_collisions():
    global finished, robots, junk

    # Handle player crashes into robot
    if collided(player, robots+junk):
        finished = True
        Text("You've been caught!", (120, 240), size=36)
        sleep(3)
        return
The return statement (and the global junk) has just been added now. It
wasn’t needed before since sleep(3) was the end of the function, but now we
will be adding to it.
- Challenge 22
Add the function
robot_crashedto your program, as defined above. Make sure yourcheck_collisionsfunction looks like the one above. Create an empty list in the main body of your program namedjunkand makejunka global variable incheck_collisions. Then insidecheck_collisions:Create an empty list named
surviving_robots.Loop through the robots list, doing the following on with each robot:
Add:
if collided(robot, junk):
    continue
immediately after the start of the
forloop. This will check if the robot has hit a piece of junk, and discard it (by not adding it tosurviving_robots).continuetells python to skip the rest of the body of the loop and start immediately with the next item in the list.Call
robot_crashedon each robot that makes it past the junk test, assigning the result to a new variable calledis_jbot.If
is_jbotisFalse, append the robot tosurviving_robots.Otherwise (
else), it is a robot that has crashed, so change it into junk and append it to thejunklist:remove_from_screen(robot.shape) robot.shape = Box((10*robot.x, 10*robot.y), 10, 10, filled=True) junk.append(robot)
After the loop finishes, reassign
robotsto an empty list.Loop through
surviving_robots, checking for collisions withjunk(usingcollided) and appending any robots that are not injunkback torobots.Finally, if
robotsis empty (if not robots):Set
finishedtoTrue.Use
Textto display “You win!”.sleepfor 3 seconds.return(not really needed here since it is the end of the function but it won’t hurt.)
At this point you should pretty much have a working game, though it’ll probably take a little while to get the bugs out of it. Congratulations! This has been a long sheet, with lots of new ideas in it; well done for surviving to the end.
What next?
The game works, but there are plenty of things it would be nice to add.
Instead of having the game end when the player eliminates all the robots, it would be good to have it start over with more robots (a higher level). You’ll need to (1) stick the whole thing you’ve written so far inside a
whileloop, (2) distinguish between the two ways in which the game hasfinished— since one should make only the innerwhileend, and the other should make them both end), and (3) make the number of robots placed byplace_robots()a variable and change it each time around the outer loop.Give the player a score that starts at 0 and increases every time they kill a robot, or something. First of all, just display the score in the Python Shell window using
print. Then try to get it displayed in the Graphics Window somewhere. Caution: if you do this you may need to decrease the size of the playing area: it might be annoying to have a score displayed over the top of where the action is happening.Stick the whole thing inside yet another
whileloop, and put a question, “Would you like another game?”, at the bottom.Now add a high-score feature.
Add — perhaps only on higher levels — some extra-tough robots, that don’t die as soon as they crash into something. For instance, the robot might have two lives , so that when it crashes into something it loses a life. If you do this, here are two recommendations:
Make these special robots a different colour. You may need to look at Sheet G (Graphics).
Probably the easiest way to implement this thing is to give every robot an attribute called
livesor something. Most will start withlivesbeing 1, but the tough ones will have more lives. Then, when robots crash, you should decrease the number of lives each of them has, and take action accordingly. You can probably lose thejunkattribute if you do this; a robot will be junk if its number of lives is 0.If you take that advice, here are two things to be careful about: (1) If a robot has no lives left, you obviously don’t need to decrease the number of lives. (2) The code that removes robots from the game may need a bit of care. A robot should only be removed when it becomes junk and the robot it crashed with became junk too.
You’ve now reached the end of this sheet. Congratulations! Some things you might not have looked at yet, and might find interesting:
The more complicated bits of Sheet F (Functions).
Sheet M (Modules) tells you a little bit about how the huge collection of useful functions that come with Python is organised.
Sheet G (The Gasp module) will tell you what things you’ve been using in these worksheets are part of Python itself, and what things were added by us to make your life easier.
Sheet D (Dictionaries and Tuples) will tell you about some things Python does that you haven’t had to use yet.
Sheet O (Classes and Objects) will tell you much more about classes and their instances.
When you’ve done that, you could go on to Sheet 6: Chomp, in which you’ll write another classic computer game using an object oriented approach.
Warning: Writing computer programs is an addictive activity.