Changing Step 6: Changing where we put the colors
Below is a selection of images that you can use in the programs in this section.
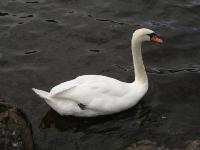
| beach.jpg | baby.jpg | vangogh.jpg | swan.jpg |
 |  |  |  |
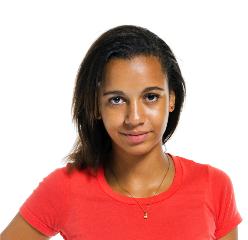
| puppy.jpg | kitten.jpg | girl.jpg | motorcycle.jpg |
 |  |  |  |
| gal1.jpg | guy1.jpg | gal2.jpg |
 |  |  |
We have been getting all of the pixels from an image using
pixels = img.load() and then looping through all the pixels using:
for col in range(img.size[0]):
    for row in range(img.size[1]):
This processed all the pixels in the first column, then all the pixels in the
second column, and so on until it processed all the pixels in the image by
using two for loops with one inside of the other. This is called a
nested loop.
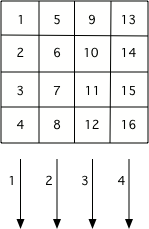
Figure 1: The order that pixels are processed if your outter loop is the column value.``
We can also loop through the pixels processing each row first by reversing the outter and inner loops:
for row in range(img.size[1]):
    for col in range(img.size[0]):
Let’s rename row as x and col as y to bring attention to how
each pixel value relates to an (x, y) value in a coordinate system.
Since the outer loop changes the x (the column) and the inner loop changes the y (the row), we will be processing all the pixels in the first row, then all the pixels in the second row, and so on until we process all the pixels in the image. The order doesn’t matter if we are just setting the red to zero at every pixel as shown below.
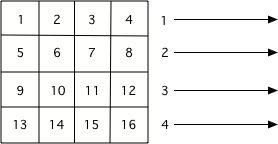
Figure 1: The order that pixels are processed if you use a nested loop with x changing in the outer loop and y changing in the inner loop.
We don’t always have to modify the pixel color. Sometimes we can just change the color at a different (x, y) location than the current pixel. This time we will combine steps 5 (getting the color) with step 6 (modifying the color) to get the pixel at (x, y) and copy the color from that pixel to the pixel at location (y, x). So this will copy the color from (0, 2) to (2, 0). Later it will also copy the color from (2, 0) to (0,2), since this loops through all the pixels in the image, but that will just copy back the original color (why?).
Try the program above on some of the other images as well by changing the file name on line 5. Does it always have the same effect?
-
csp-11-5-1: What happened when we copied the pixel color from (x, y) to (y, x)?
- We rotated the image 90 degrees to the left and flipped it over.
- This would be true if we created a new image and set the values in the new image from the old pixel values.
- We mirrored the image around a diagonal line from the top left to the bottom right.
- This is true since we copy the pixel colors from the current image to the new location.
- We flipped the image horizontally.
- The pixels would be copied to the same row.
- No change.
- Compare this image to the original vangogh.jpg image.
This one does a little math with the x and y.
Try the program above on some of the other images as well by changing the file name on line 5. Which picture looks the best after you run the program?