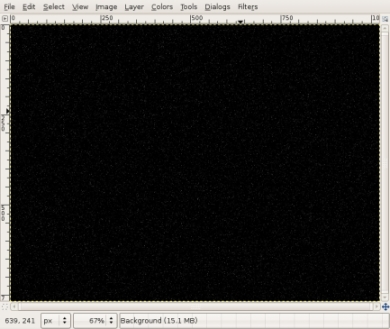
 This is what your document screen should look
like at this point.
This is what your document screen should look
like at this point.One of the most reocurring pieces of this tutorial is the stars imágenes. Lesson 5 is the tutorial that teaches how to create one. This lesson will have a lot of what you haven't learned yet - but it's really just meant to show you the type of thing you can do with the GIMP, and maybe you can pick up a few things along the way.
Start by creating a new document size 1024 px by 768 px. Using the fill tool, make the document black.
In the new document screen, select filters in the top bar. Then select the
Noise sub-menu, and then select HSV Noise.
Set the Holdness (the first setting) to 4. Set the
Hue & Saturation to 0. Set the Value
as 190. Click Ok. You should see a few star-like dots appear.
Again in the new document screen (it should be title something like
*Untitled-1.0), select Colors, then select
Brightness & Contrast.
Set Brightness to -25 (negative 25), then
set Contrast to +55 (positive 55).
This should space out the dots a bit.
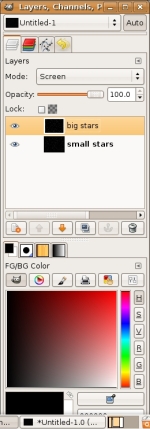
Now go into the Layers menu, double click on the only layer up
(probably titled Background), and name the layer
small stars. These imágenes show what everything should look like at
this point.
This is what your document screen should look
like at this point.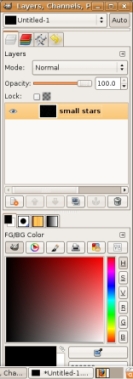 This is what your layers screen
should look like at this point
This is what your layers screen
should look like at this pointGo to your layers screen. Right click on the small stars layer,
and select Duplicate Layer. Double click this new layer, and name
it big stars.
Make sure that the big stars layer is selected. Again go to
Colors, then Brightness & Contrast. Set
Brightness to -70 (negative 70) and
Contrast to +40 (positive
40).
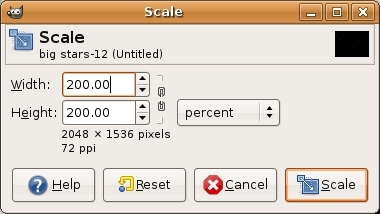
Now we want to enlarge the image. Press Shift-T. There should be a little
drop down on the right side of the dialogue that comes up, it should say
pixels, which is the default. Click the drop down, and change the
value to percent. Set both the width and height to 200 (so we're enlarging the
width and height by 200%).
Now we're going to try to make the stars a bit more visible. In the document
screen, select Colors then Invert, just so we can see
the stars slightly better. Then go to Colors then
Threshold. Click the Auto button. The stars should be
a lot more visible now. Invert the colors again to get it back to normal.
Let's get this layer almost back to it's original size. We'll change the
percent value to 53%, since obviously 50% of
200 is 100. So, press Shift-T, and
change the height and width to 53% (you might have to select
percent from the drop down menu again).
We'll be using the alignment tool to center the layers.
Click on the alignment tool. Then make sure that big stars is
the selected layer, and click on the imágenes. The preferences of this tool
should now become active.
In the tools screen (where the alignment preferences are), click on the drop
down menu Relative to:, select image. Under the
Relative to: section (not the Distribute section!),
click on the two middle buttons.
Now they're centered.
Go to the Layers menu. In the Mode drop down menu, select
Screen. Now we have a zoom or echo-effect. To avoid this we simply
rotate the layer by 180°. (Shift+R to use the rotate
tool: enter 180°).
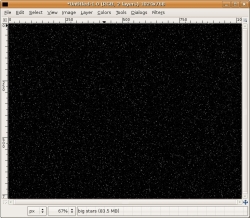
Here's where you should be so far:
If you haven't yet - SAVE!
Now use the free select tool, and randomly select all around your document. Here's what mine looked like:
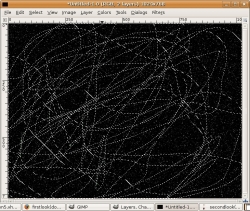
Now, in the document screen, go to the select drop down, then select grow.
Plug in 8 and hit OK. Now we're going to delete the selected parts
by simply pressing Delete. If anything is still selected: go to
Select then None.
Now create a new layer by right clicking in the layers menu, and pressing
New Layer. Click and drag this layer below the
small stars layer in the Layers menu. Make sure this layer is
selected, and fill it black.
Now lets activate our small stars layer. Right click the small stars layer
in the layers dialog, choose Add alpha channel.
Again use the free selection tool to select some parts of the image by random move the selection tool all over the layer, but it should be much less than the wild selection in step 7.
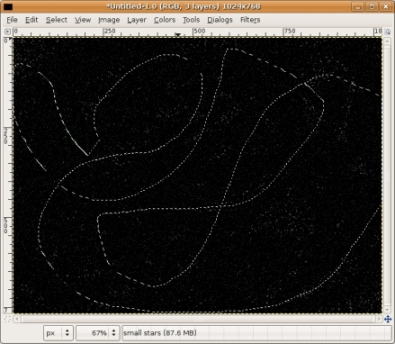
Go to select, then feather, and put in 50px. Click OK. Then
delete the selection by pressing delete. The stars should be still visible, but
some may be less visible or black. If neccessary, go to Select then
None.
Now we're going to quickly merge everything. Just go to (in the document
screen): Image, then Merge Visible Layers, then
Merge.
In the tools menu, select the Clone tool, and, in that tool's preferences,
select Screen as the mode, then click on the Brush drop down menu,
and select the Sparks brush. Press Control, and click anywhere in the image
(preferably an area with a lot of stars). Then bring your mouse over to a
different point (prefereably an area with few visisble stars), and brush all
over. It might be hard to tell, but this is just randomizing the stars.
Duplicate the layer; name this Stars glow or something.
We're going to change a lot of settings here. First go to
Filter then Blur then Gaussian Blur, and
set the horizontal to 15 (pixels), the vertical will change automatically.
Now go to Colors and then Color Balance. Select
shadows in the select list, and set Cyan to
-100, Magneta to 0 and
Yellow to 40. Then select Midtone (under Shadow); set Cyan to -100, Magneta to 30
and Yellow to 40. Then select Highlights
and set Cyan to -100, Magneta to
30 and Yellow to 40.
Now in the layers menu, in the Mode drop down, select
Screen.
Now, let's add some fun. Create a new layer, fill it black. Go to
Filter, Light and Shadow and then
Supernova. Having the filter dialog open enter any values you like
to create you shining star. But don't make it too big for the first time and
place it in the middle - this is most easily done by setting the drop down menu
to percent, and then putting 50 as the value for both. Now in the layers menu,
set the Mode to Addition. Now move the layer around
to where you want your star. You can duplicate it or scale it or whatever.
Optional: You can add some more color if you like. Make another layer, fill
it black, add a supernova - but this time change the color. When you do so:
notice the first two numberic values: H and S. Copy
them down - don't forget them! Set the mode to addition (after you've added the
supernova) and then go to the stars glow layer. Select an area, go to
Colors then Colorize - and plug in those values,
change the lightness to whatever you like.
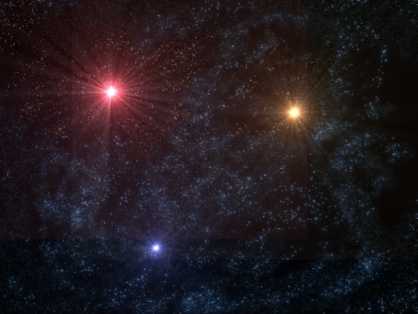 Final Stars Image
Congratulations, you have finished Lesson 6!