Game Playing: Programming a video game
Introduction
The Lode Runner game has been the most popular download for this web-site ever since its inception 12 years ago. It introduces the logic of a video game and uses simply terminal graphics and control of the keyboard to interface with the player. This has been problematic since not all systems respond appropriately, especially with the keyboard.
I've been looking at pygame for a special project modeled after Mitchel Resnicks "Turtles, Termites, and Traffic Jams, Explorations in massively parallel microworlds". That project will model the Ants world and it's coming along nicely.
To introduce the bare-bones of Pygame, I want to start by adapting the keyboard and screen I/O of Loderunner to pygame. This gives us a friendlier program with a bit of color and automatic keyboard control that works better across systems. And it's a nice way to get familiar with Pygame if you are not already. I hope you will also look at the Microworld project when it comes out.
To keep things short and avoid duplication I'm going to assume that the reader is familiar with existing Lode Runner project. But here is the briefest of overviews.
                            &_*___|_
                      |           |
                      |           |
                     _|__*________|_&____*___
                      |           |
              ___*____|______^____|_
                      |           |
                      |           |
                      |           |
____*_________________|___________|______*____
The board is a set of ladders and "catwalks" with some "lodes" or nuggats scattered about. The player is represented by a "^" character which the player controls with the arrow keys. When ^ passes over a lode (*) it is picked up. The player is chased by "robots" represented by the "&" symbol. The robots try to tag the player and if one of them succeeds, the game is over.
In addition to the arrow keys, pressing an "a" will remove a piece of catwalk to the left of the player or replace it if it's missing. And an "s" will do the same to the right of the player. If you are running along a catwalk, pressing the up or down key will stop you. If a robot is coming toward you, you can stop, burn a hole between you that the robot will fall through. Do NOT however burn a hole ahead of yourself while running.
It's all a bit like Pacman.
Our Pygame implementation is very much like the original. The characters for the player, robots, ladders and catwalks become pygame sprites that we generate from character "bitmaps". The keyboard input is handled by pygame. One reason for doing it this way is that some readers have invested time in creating more challenging boards and improving the program in other ways as well. It should be possible for them to adapt their code to pygame with minimal effort.
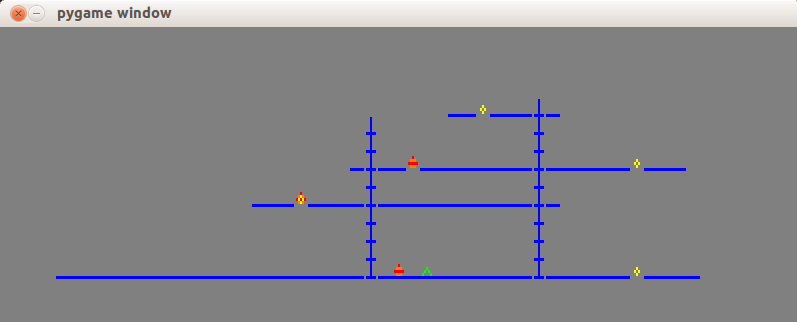
For a taste of what's to come, here is a screen shot of the new game. It shows the player in green, lodes in yellow, 3 robots (striped) with one sitting on a lode.
Just Enough Pygame
Pygame basically deals with screens, surfaces and bitmaps where pixels have a geometric location (x and y) and a color. The location (0,0) is the upper left corner of a surface. As x increases we move to the right. As y increases we move down. Each pixel has a color expressed as a triple (red,green,blue) where each of these may take any integer value from 0 to 255. Bright red is (255,0,0). Solid black is (0,0,0). Solid white (255,255,255). A good orange is (255,128,0). It's like mixing paints.
One color may be designated as "transparent". In this project we'll use (1,1,1) to indicate transparency. When one surface is written (blitted) to another, pixels that are transparent are not copied and whatever previous color the target pixel had is retained.
If you need to install Pygame go to pygame.org and get the download appropriate for your system. The code here is for Python 2.7
Let's play with the Python interactive mode
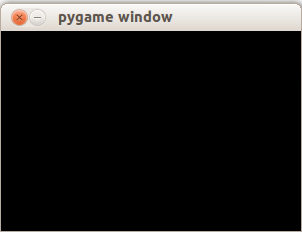
>>> import pygame
>>> screen = pygame.display.set_mode((300,200))
Assuming Pygame installed correctly, you should now have window in black that is 300 pixels wide and 200 high. Notice the single argument is a tuple (300,200). The function name set_mode seems a bit strange but there are also optional arguments that we are not specifying.
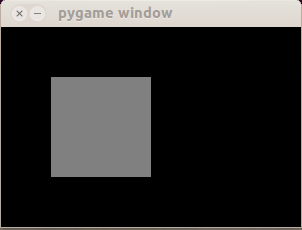
>>> pygame.draw.rect(screen, (128,128,128), (50,50,100,100), 0)
<rect(50, 50, 100, 100)>
Though you don't see anything yet, a gray (dark white = (128,128,128)) rectangle has been drawn on the screen surface. The upper left corner of the rectangle is at pixel location (50,50) and is 100 pixels wide and 100 pixels high.
>>> pygame.display.flip()
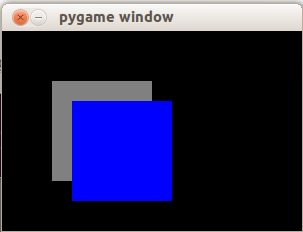
With this command Pygame "flips" the display, taking what you have written to the screen and outputting it to the physical display. Typically you then erase and redraw "screen" and when it's ready you can "flip" it again. Actually, let's not erase the screen but rather simply draw a second rectangle, this time in blue and offset a bit.
>>> pygame.draw.rect(screen, (0,0,255), (70,70,100,100), 0)
>>> pygame.display.flip()
Sprites on the screen
Let's do the following
>>> img = pygame.image.load("felix.gif")
>>> screen.blit(img, (100,100))
<rect(100, 100, 80, 100)>
>>> pygame.display.flip()
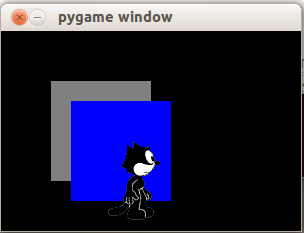
The file "felix.gif" is a small graphic loaded onto a surface that is created for the appropriate size. The surface is referenced by the variable "img". The screen "blits" this image to itself with the upper left corner of the image at the screen location(100,100). Blitting is just a very fast way of copying pixels from one surface to another. Flipping the display lets us see the updated screen contents. Although the image is 80 pixels wide and 100 high it does not completely overlay the blue square already on the screen. This is done by having a transparent color defined in the img surface. Pixels of this "color" are not blitted to the target surface allowing whatever was there below to still be visible.
Making our own simple sprites
Let's try the following.
>>> import pygSprites
>>> print pygSprites.player
   T
   T
   g
  g g
 g   g
TTTTTTT
>>> playerSprite = pygSprites.cmapToSprite(pygSprites.player,2,3)
>>> playerSprite
<Surface(14x18x32 SW)>
>>> screen.blit(playerSprite, (90,90))
<rect(90, 90, 80, 100)>
>>> pygame.display.flip()
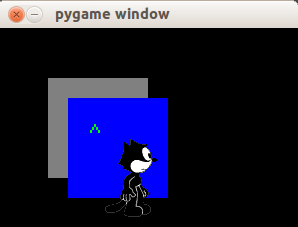
And our "player" sprite built above is blitted onto the screen as well. Click to examine pygSprites.py
The character based graphic (cmap) above for the player contains some green and some transparency. Transparency is due to both the spaces and the 'T' characters. The cmap is in the form of a rectangle. Using a color_map, the funtion cmapToSprite builds a sprite surface where each letter is converted to a tiny rectangle of the appropriate color. The last arguments indicate x and y scaling factors (number of pixels per char). In this call each tiny rectangle is allocated 2 pixels horizontally and 3 vertically.
The color_map is a dictionary that maps characters (like 'r' for "red") to triples of RGB values.
>>> print pygSprites.color_map
color_map = {
    'r':(255,  0,  0),  # red
    'o':(255,128,  0),  # orange
    'y':(255,255,  0),  # yellow
    'g':(  0,255,  0),  # green
    'b':(  0,  0,255),  # blue
    'w':(128,128,128),  # white
    'T':(  1,  1,  1),  # transparent
    ' ':(  1,  1,  1)   # transparent
}
Simply importing pygSprites sets the module global sprites to a dictionary of surfaces indexed by the characters on the playing board. They are then used by pygGraf.py to paint the screen with pieces of ladders and catwalks, along with robots, lodes and you (the player).
The initial board is defined in board.py and is the same as the traditional Loderunner project.
Emulating character graphics in Pygame
The module pygGraf.py supplies pygame versions of the functions setSpecial, setNormal, readLookAhead, writeBoard, and writeScreen that were also in the original lode runner. It also queries pygames event queue to see if any keys have been typed.
Asynchronous keyboard input is pretty much built in to pygame. Events such as a key pressed down or the exit button clicked are processed in the background and an event object is created for each occurance. Event objects are then queued. The events in the event queue can be retrieved in a list. These events are then removed from the queue.
Let's try the following. Start by creating a new small window on the screen
>>> pygame.display.quit()
>>> pygame.display.set_mode(( 40,50))
<Surface(40x50x32 SW)>
Notice that the focus is on the little window just created. You can tell by the "quit" button being orange. Type 3 characters 'a','b','c' and the down arrow. There will be no echo. Then click the "quit" button. Again nothing will happen. Get back to Python by clicking in its window and do the following.
>>> events = pygame.event.get()
>>> len(events)
44
So we have a lot of events but we're interested in just the keys pressed and the quit button clicked. Let's do a little list comprehension magic.
>>> [event.key for event in events if event.type == pygame.KEYDOWN]
[97, 98, 99, 274]
Here we have extracted just the four keyboard events ('a' is 97, down-arrow is 274) and below we'll find the exit click.
>>> [event for event in events if event.type == pygame.QUIT]
[<Event(12-Quit {})>]
It up to your program logic to filter and interpret the events of interest.
Running the Program
Get the zip file pygLode.zip and expand it into a directory of your choice. Then simply run the following command from the same directory
$ python pygLode.py
Have fun, but spare the keyboard.
Copyright © 2015-2015 Chris Meyers